How to Install KegLink on Your Keg for Real-Time Monitoring

When it comes to draught beer operations, keeping track of kegs outside the brewery and ensuring beer quality from brewery to tap is essential. That’s where BinaryBeer’s KegLink™ device comes in. KegLink transforms your standard kegs into “smart” kegs by enabling you to monitor beer freshness, location, and temperature in real-time. In this blog post, we’ll walk you through the simple steps for installing KegLink on your kegs, enabling seamless tracking and data access right from the Binary Cloud platform.

Step 1: Unboxing and Preparing the Required Tools

Start by unboxing the KegLink device and gathering any included installation tools. You’ll find that the device is designed to retrofit easily onto most kegs.

The KegLink package includes:

  • The KegLink device with pre-installed screws
  • Torque-Stick
  • Torx Driver


What you will need:

  • Drill

Step 2: Position the KegLink Device on the Keg

Identify the recommended spot on the keg for optimal sensor functionality. Ideally, the KegLink device should be attached in a location that won’t interfere with keg handling or stacking.

  • Optimal placement: Align the Keglink to a ‘drain hole’ between the handles.
  • Why it matters: Correct positioning ensures water will not build up behind the Keglink for extended periods of time, and ensures a consistent installation location.

Step 3: Secure the Device

Secure the KegLink device to the keg by tightening the pre-installed fasteners with the drill. 

Tip: Ensure the bit is aligned correctly and seated securely in the head of the bit. If the bit is not seated correctly, the user risks stripping the screw head and not creating sufficient torque to secure the keg.

Tighten both screws until you hear a click from the torque-stick.

Note:The torque-stick ensures the correct force is applied to the device to keep it in place. Once you hear the click noise, the bit will not allow the screw to be any tighter so you don’t need to keep tightening after you hear a “click”.

Note: The KegLink device is built to endure the demands of regular keg use, including washing with caustic solutions and exposure to sunlight, so rest assured it’s robust and long-lasting.

Step 4: Test the Device

Test the KegLink by applying a reasonable amount of force to ensure it does not move.

Note: Small movements caused by excessive force are not a concern.

Step 5: Start Tracking and Monitoring

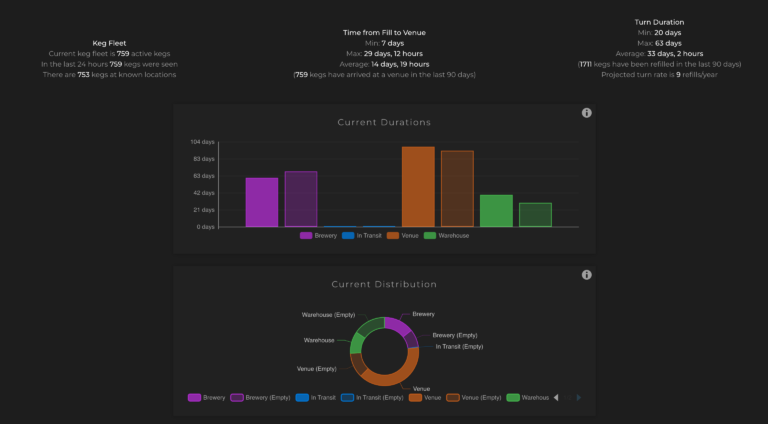
After installation, check that the device is working correctly by accessing the Binary Cloud platform. The KegLink device will automatically upload real-time data to the cloud, with no need for manual scanning or intervention.

With the KegLink device successfully installed, you can begin monitoring your kegs. From the Binary Cloud platform, you can view:

  • Location Tracking: See where each keg is at all times and track its journey from the brewery to the venue.
  • Temperature Monitoring: Ensure your beer is stored and served at optimal temperatures.
  • Freshness Indicators: Keep an eye on how long your beer has been on tap and manage quality proactively.
  • And More

Conclusion

Installing KegLink on your kegs is a quick and straightforward process that offers long-term benefits for breweries. By turning ordinary kegs into smart kegs, KegLink provides essential data that helps you make informed decisions and optimise operations. 

Ready to transform your kegs? Get started with KegLink and take control of your supply chain from brewery to tap. Contact us to learn more at [email protected] or book a demo.

Facebook
X
LinkedIn

Newsletter

Subscribe to our Newsletter

Latest Posts

How to Install KegLink on Your Keg for Real-Time Monitoring
November 14, 2024
binary beer media highlights
BinaryBeer in the News: Our Media Coverage Highlights
August 8, 2024
smart-keg-technology
Do You Really Need to Buy More Kegs?
June 17, 2024
production-planning-brewery
Easy Production Planning in Brewery with Data
June 17, 2024
brewery-planning-management
IoT Keg Tracking: KegLink’s Place Tags
June 17, 2024

When it comes to draught beer operations, keeping track of kegs outside the brewery and ensuring beer quality from brewery to tap is essential. That’s where BinaryBeer’s KegLink™ device comes in. KegLink transforms your standard kegs into “smart” kegs by enabling you to monitor beer freshness, location, and temperature in real-time. In this blog post, we’ll walk you through the simple steps for installing KegLink on your kegs, enabling seamless tracking and data access right from the Binary Cloud platform.

Step 1: Unboxing and Preparing the Required Tools

Start by unboxing the KegLink device and gathering any included installation tools. You’ll find that the device is designed to retrofit easily onto most kegs.

The KegLink package includes:

  • The KegLink device with pre-installed screws
  • Torque-Stick
  • Torx Driver


What you will need:

  • Drill

Step 2: Position the KegLink Device on the Keg

Identify the recommended spot on the keg for optimal sensor functionality. Ideally, the KegLink device should be attached in a location that won’t interfere with keg handling or stacking.

  • Optimal placement: Align the Keglink to a ‘drain hole’ between the handles.
  • Why it matters: Correct positioning ensures water will not build up behind the Keglink for extended periods of time, and ensures a consistent installation location.

Step 3: Secure the Device

Secure the KegLink device to the keg by tightening the pre-installed fasteners with the drill. 

Tip: Ensure the bit is aligned correctly and seated securely in the head of the bit. If the bit is not seated correctly, the user risks stripping the screw head and not creating sufficient torque to secure the keg.

Tighten both screws until you hear a click from the torque-stick.

Note:The torque-stick ensures the correct force is applied to the device to keep it in place. Once you hear the click noise, the bit will not allow the screw to be any tighter so you don’t need to keep tightening after you hear a “click”.

Note: The KegLink device is built to endure the demands of regular keg use, including washing with caustic solutions and exposure to sunlight, so rest assured it’s robust and long-lasting.

Step 4: Test the Device

Test the KegLink by applying a reasonable amount of force to ensure it does not move.

Note: Small movements caused by excessive force are not a concern.

Step 5: Start Tracking and Monitoring

After installation, check that the device is working correctly by accessing the Binary Cloud platform. The KegLink device will automatically upload real-time data to the cloud, with no need for manual scanning or intervention.

With the KegLink device successfully installed, you can begin monitoring your kegs. From the Binary Cloud platform, you can view:

  • Location Tracking: See where each keg is at all times and track its journey from the brewery to the venue.
  • Temperature Monitoring: Ensure your beer is stored and served at optimal temperatures.
  • Freshness Indicators: Keep an eye on how long your beer has been on tap and manage quality proactively.
  • And More

Conclusion

Installing KegLink on your kegs is a quick and straightforward process that offers long-term benefits for breweries. By turning ordinary kegs into smart kegs, KegLink provides essential data that helps you make informed decisions and optimise operations. 

Ready to transform your kegs? Get started with KegLink and take control of your supply chain from brewery to tap. Contact us to learn more at [email protected] or book a demo.